CONTENT
Working with M (Power Query) in Power BI
Discover how to use M language in Power Query to transform and combine data creatively in Power BI.


Saartje Ly
Data Engineering Intern
May 18, 2024
Introduction
M, short for "mashup language," is the important scripting language behind Power Query in Excel and Power BI. It allows you to import, transform, and combine data from various sources in creative ways. While Power Query’s user interface enables you to manipulate data through clicks and drags, every action you perform is translated into M code. You can write M in the Query editor formula bar, or in View > Advanced Editor. M query can create a single value, list (array), table, or even a function.
M query basics

Everything done in this article is executed in Power Query in Power BI. You can access Power Query in the Home tab by clicking on Transform data.
Adding a column from examples
1. Head to the Add column tab
2. Click Column from examples
3. Fill the custom column rows with a value corresponding to another column. Here, I wrote ‘cheap’ for cheap Unit Prices, and wrote ‘expensive’ for expensive Unit prices. Power Query found a pattern and filled the rest of the column for me.

4. After pressing OK, let’s say we want [Unit Price] to be larger or equal to 205, not 205.99. Edit the M code as necessary.
Creating records
1. Right click on the Queries pane to the left, select New Query, then click Blank Query.
2. Add your first symbol record. Make sure to put an equal sign in front.
3. Create multiple records inside the square brackets using a comma.

4. When you’re ready, convert the records into a table by clicking Into Table on the top left.
Creating a list
1. Right click on the Queries pane to the left, select New Query, then click Blank Query.
2. Create a list by using curly braces {}. The two dots indicate that we want to start at a number and end at the other number.

Note this will also work for literals i.e. “A”..”Z”.
Creating a table
Let’s say we have a list of records and we’d like to convert them to a table. You can use the Table.FromRecords function to do so.
#shared (finding functions)
#shared is a special keyword that provides access to all the functions, constants, and values that are available within the current environment.
1. Create a new Blank Query
2. Type = #shared
You’ll receive a list of all the functions available to you.
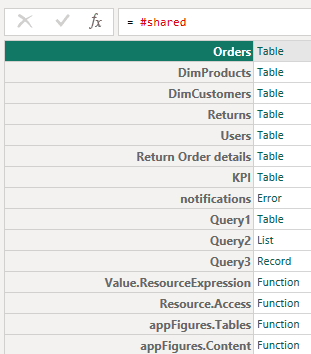
It’ll also display all the queries and everything in the internal sheet.
3. Convert this into a table
4. You now have the option to search for functions by clicking on the down arrow on the name bar

5. If you select inside the box of the ‘function’ value, it will give you a description of what the function does.
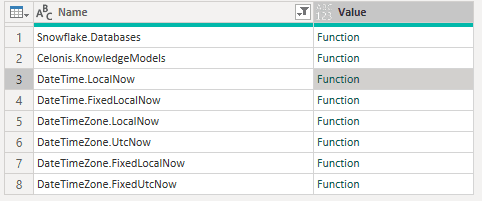

Use this function with parentheses.
Making our list dynamic with M
With our new found DateTime.LocalNow function and another function called Date.Year which extracts a year, we can edit our list to start at the year 2000 and end at the current year.
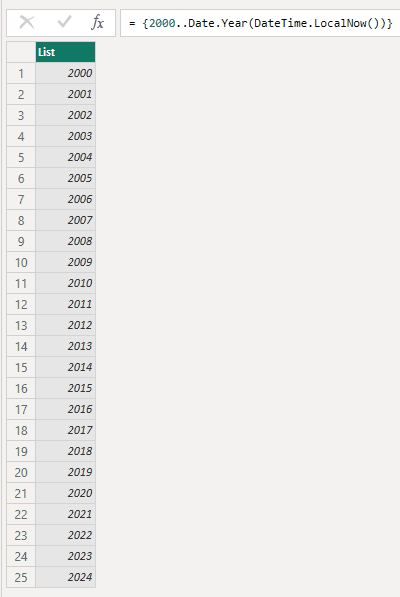
Let’s now say we want to shift this year range to make it fully dynamic. Using our #shared list, we find the corresponding function (Date.AddYears). We want our year range to be 10 years ago to the current year.

Functions
Let’s say we want to write a function that takes a website and loops over different offset values, firing a query per offset.
The following is based on this website here
1. Right click on the Queries pane, select New Query, then select Web
2. Paste the websites URL and then click OK

3. Click connect.

4. Find the table and click OK.

5. In the view tab, click Advanced Editor

We will insert our function here. Notice in the Source, there is no page number to edit. Instead, we must add an offset to navigate between different pages of the dataset.
6. We add in ‘&offset=’ to be able to display the values in the dataset, starting from the value after offsetVar. Note that Number.ToText is important to add as we are adding a number to a text URL.
At the top, put your function () =>.

Click done when finished.
7. We can now pass in any number that will replace the offsetVar variable in the URL. For example inputting 10 will give us the movie table, with 10 data rows skipped.
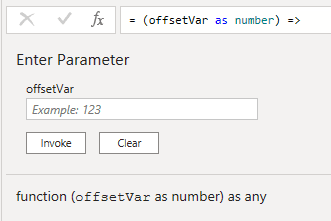
Let’s now invoke this function based off of a list.
1. Create a new sequentially numbered list

2. Convert it to a table, and rename it Offset.
3. Head to the Add column tab, and click Invoke Custom Function
4. Choose the Function query that we created before, and choose the offsetVar to be the table we just created.

Click OK.
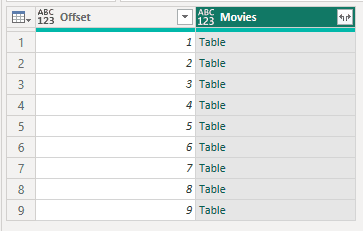
We should now have another column called Movies, where each value is a table. Click on each ‘Table’ box to view the table we have pulled out with our function.
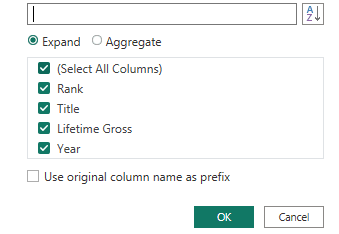
5. Click the split arrows if you’d like to append all these tables together.
6. Click Close and Apply on the top left corner.
Introduction
M, short for "mashup language," is the important scripting language behind Power Query in Excel and Power BI. It allows you to import, transform, and combine data from various sources in creative ways. While Power Query’s user interface enables you to manipulate data through clicks and drags, every action you perform is translated into M code. You can write M in the Query editor formula bar, or in View > Advanced Editor. M query can create a single value, list (array), table, or even a function.
M query basics

Everything done in this article is executed in Power Query in Power BI. You can access Power Query in the Home tab by clicking on Transform data.
Adding a column from examples
1. Head to the Add column tab
2. Click Column from examples
3. Fill the custom column rows with a value corresponding to another column. Here, I wrote ‘cheap’ for cheap Unit Prices, and wrote ‘expensive’ for expensive Unit prices. Power Query found a pattern and filled the rest of the column for me.

4. After pressing OK, let’s say we want [Unit Price] to be larger or equal to 205, not 205.99. Edit the M code as necessary.
Creating records
1. Right click on the Queries pane to the left, select New Query, then click Blank Query.
2. Add your first symbol record. Make sure to put an equal sign in front.
3. Create multiple records inside the square brackets using a comma.

4. When you’re ready, convert the records into a table by clicking Into Table on the top left.
Creating a list
1. Right click on the Queries pane to the left, select New Query, then click Blank Query.
2. Create a list by using curly braces {}. The two dots indicate that we want to start at a number and end at the other number.

Note this will also work for literals i.e. “A”..”Z”.
Creating a table
Let’s say we have a list of records and we’d like to convert them to a table. You can use the Table.FromRecords function to do so.
#shared (finding functions)
#shared is a special keyword that provides access to all the functions, constants, and values that are available within the current environment.
1. Create a new Blank Query
2. Type = #shared
You’ll receive a list of all the functions available to you.

It’ll also display all the queries and everything in the internal sheet.
3. Convert this into a table
4. You now have the option to search for functions by clicking on the down arrow on the name bar

5. If you select inside the box of the ‘function’ value, it will give you a description of what the function does.


Use this function with parentheses.
Making our list dynamic with M
With our new found DateTime.LocalNow function and another function called Date.Year which extracts a year, we can edit our list to start at the year 2000 and end at the current year.

Let’s now say we want to shift this year range to make it fully dynamic. Using our #shared list, we find the corresponding function (Date.AddYears). We want our year range to be 10 years ago to the current year.

Functions
Let’s say we want to write a function that takes a website and loops over different offset values, firing a query per offset.
The following is based on this website here
1. Right click on the Queries pane, select New Query, then select Web
2. Paste the websites URL and then click OK

3. Click connect.

4. Find the table and click OK.

5. In the view tab, click Advanced Editor

We will insert our function here. Notice in the Source, there is no page number to edit. Instead, we must add an offset to navigate between different pages of the dataset.
6. We add in ‘&offset=’ to be able to display the values in the dataset, starting from the value after offsetVar. Note that Number.ToText is important to add as we are adding a number to a text URL.
At the top, put your function () =>.

Click done when finished.
7. We can now pass in any number that will replace the offsetVar variable in the URL. For example inputting 10 will give us the movie table, with 10 data rows skipped.

Let’s now invoke this function based off of a list.
1. Create a new sequentially numbered list

2. Convert it to a table, and rename it Offset.
3. Head to the Add column tab, and click Invoke Custom Function
4. Choose the Function query that we created before, and choose the offsetVar to be the table we just created.

Click OK.

We should now have another column called Movies, where each value is a table. Click on each ‘Table’ box to view the table we have pulled out with our function.
5. Click the split arrows if you’d like to append all these tables together.

6. Click Close and Apply on the top left corner.
Introduction
M, short for "mashup language," is the important scripting language behind Power Query in Excel and Power BI. It allows you to import, transform, and combine data from various sources in creative ways. While Power Query’s user interface enables you to manipulate data through clicks and drags, every action you perform is translated into M code. You can write M in the Query editor formula bar, or in View > Advanced Editor. M query can create a single value, list (array), table, or even a function.
M query basics

Everything done in this article is executed in Power Query in Power BI. You can access Power Query in the Home tab by clicking on Transform data.
Adding a column from examples
1. Head to the Add column tab
2. Click Column from examples
3. Fill the custom column rows with a value corresponding to another column. Here, I wrote ‘cheap’ for cheap Unit Prices, and wrote ‘expensive’ for expensive Unit prices. Power Query found a pattern and filled the rest of the column for me.

4. After pressing OK, let’s say we want [Unit Price] to be larger or equal to 205, not 205.99. Edit the M code as necessary.
Creating records
1. Right click on the Queries pane to the left, select New Query, then click Blank Query.
2. Add your first symbol record. Make sure to put an equal sign in front.
3. Create multiple records inside the square brackets using a comma.

4. When you’re ready, convert the records into a table by clicking Into Table on the top left.
Creating a list
1. Right click on the Queries pane to the left, select New Query, then click Blank Query.
2. Create a list by using curly braces {}. The two dots indicate that we want to start at a number and end at the other number.

Note this will also work for literals i.e. “A”..”Z”.
Creating a table
Let’s say we have a list of records and we’d like to convert them to a table. You can use the Table.FromRecords function to do so.
#shared (finding functions)
#shared is a special keyword that provides access to all the functions, constants, and values that are available within the current environment.
1. Create a new Blank Query
2. Type = #shared
You’ll receive a list of all the functions available to you.

It’ll also display all the queries and everything in the internal sheet.
3. Convert this into a table
4. You now have the option to search for functions by clicking on the down arrow on the name bar

5. If you select inside the box of the ‘function’ value, it will give you a description of what the function does.


Use this function with parentheses.
Making our list dynamic with M
With our new found DateTime.LocalNow function and another function called Date.Year which extracts a year, we can edit our list to start at the year 2000 and end at the current year.

Let’s now say we want to shift this year range to make it fully dynamic. Using our #shared list, we find the corresponding function (Date.AddYears). We want our year range to be 10 years ago to the current year.

Functions
Let’s say we want to write a function that takes a website and loops over different offset values, firing a query per offset.
The following is based on this website here
1. Right click on the Queries pane, select New Query, then select Web
2. Paste the websites URL and then click OK

3. Click connect.

4. Find the table and click OK.

5. In the view tab, click Advanced Editor

We will insert our function here. Notice in the Source, there is no page number to edit. Instead, we must add an offset to navigate between different pages of the dataset.
6. We add in ‘&offset=’ to be able to display the values in the dataset, starting from the value after offsetVar. Note that Number.ToText is important to add as we are adding a number to a text URL.
At the top, put your function () =>.

Click done when finished.
7. We can now pass in any number that will replace the offsetVar variable in the URL. For example inputting 10 will give us the movie table, with 10 data rows skipped.

Let’s now invoke this function based off of a list.
1. Create a new sequentially numbered list

2. Convert it to a table, and rename it Offset.
3. Head to the Add column tab, and click Invoke Custom Function
4. Choose the Function query that we created before, and choose the offsetVar to be the table we just created.

Click OK.

We should now have another column called Movies, where each value is a table. Click on each ‘Table’ box to view the table we have pulled out with our function.
5. Click the split arrows if you’d like to append all these tables together.

6. Click Close and Apply on the top left corner.
CONTENT
SHARE