CONTENT
Setting up AI Agents on top of your Power BI Semantic Models
Data agents have been made generally available to use in fabric environments, changing how businesses interact with their data. Instead of static dashboards, users can now ask questions in natural language and get real insights instantly.


Jackie Tejwani
Director - Business Intelligence
Setting up AI Agents on top of your Power BI Semantic Models
Data Agents are now generally available in Microsoft Fabric, changing how businesses interact with their data. Instead of relying only on static dashboards, users can now ask questions in natural language and get real insights instantly.
In this guide, I’ll walk you through how to set up an AI Agent on top of your Power BI semantic model — and what actually matters in real-world use.
What are Fabric AI Agents?
A Fabric AI Agent is a chat-based interface powered by AI that connects directly to your data model.
Think of it as:
A BI Analyst on demand
A smarter version of Q&A
A bridge between business users and your semantic model
Prerequisites
Before you start, you will need:
A Fabric capacity workspace (F2 and above)
A published semantic model
Access to the Power BI Admin portal
Step 1: Enable AI Capabilities
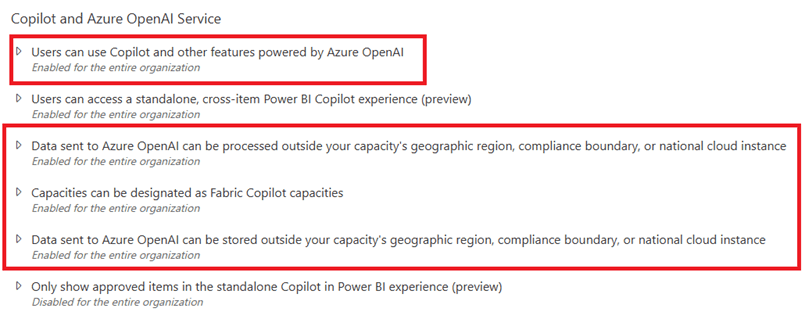
Within the Admin portal, you will need to enable the Copilot and Azure OpenAI Service settings under Tenant Settings.
Please note that this also enables:
Data sent to Azure OpenAI to be processed outside your capacity’s geographic region, compliance boundary, or national cloud instance
Data sent to Azure OpenAI to be stored outside your capacity’s geographic region, compliance boundary, or national cloud instance
This means that some processing may happen outside your Fabric capacity region.
At this stage, this setting appears to be required. However, as organisations adopt Data Agents more widely, this may change over time.
Step 2: Create Your Agent
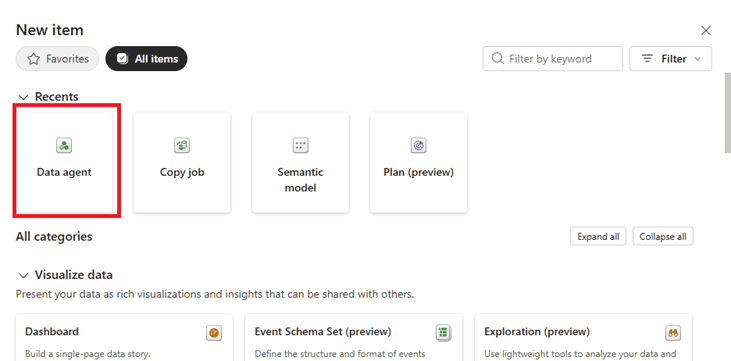
To create your agent, go into your Fabric workspace, click New > Data Agent, and then give your agent a name.
A good practice is to give it a role-based name, such as Sales Analyst Agent.
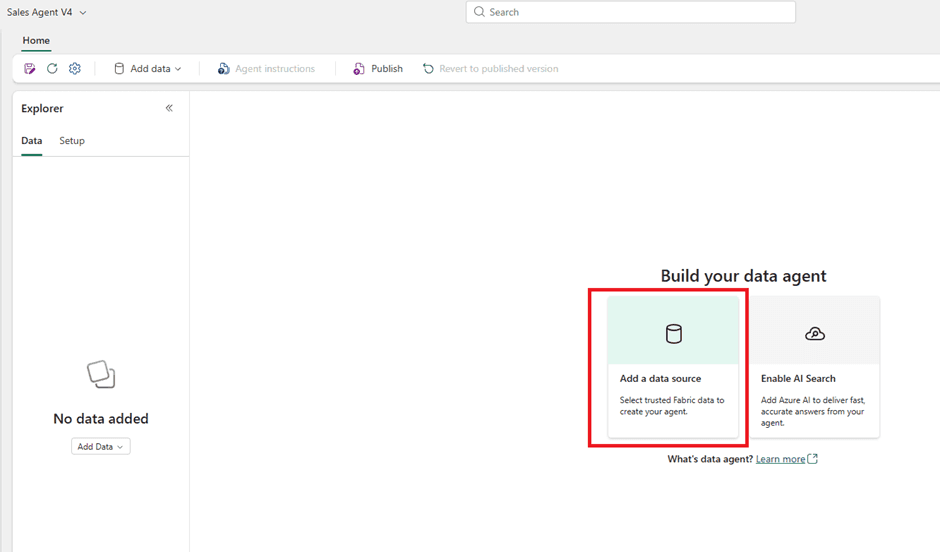
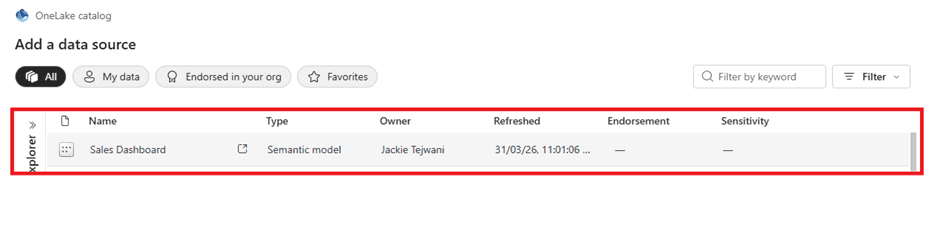
Step 3: Connect to a Semantic Model
Before connecting your agent to a semantic model, make sure the model follows best practices, such as a star schema design.
Once you have connected to the Semantic model, select all the tables you want the Agent to connect to. You can select your measures, fact and dim tables
Step 4: Define Role & Purpose
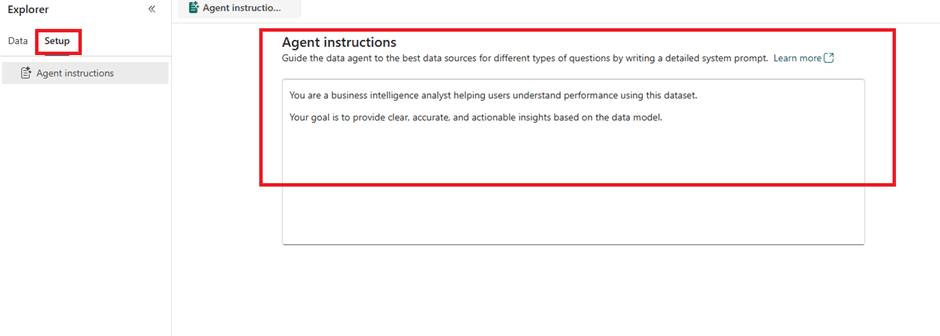
Within your agent, there is a section for Agent Instructions.
Go to Setup > Agent Instructions and add your prompt there.
This is one of the most important steps, as the quality of the instructions will influence how useful and relevant the agent’s responses are.
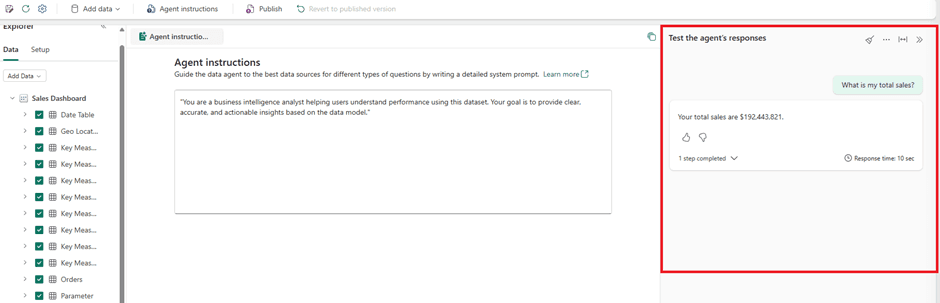
Step 5: Testing your agent
Start with a simple prompt such as “Total Sales” and work your way up.
Then try breaking results down by time periods, for example:
Total Sales by Year
Total Sales by Quarter
After that, test across key dimensions such as Sales Manager and Product.
I’ve found that these agents can quickly pick up your style of questioning, which makes testing even more important.
Check for:
Accuracy
Relevance
Consistency
Step 6: Publish your agent
Once you are happy with the model's performance, you can publish your agent

Common Pitfalls
Treating it like magic
It’s not. It’s only as good as your data model.
Poor instructions
Generic agents give generic answers.
Weak semantic layer
If your model isn’t business-ready, the agent won’t be either.
Setting up AI Agents on top of your Power BI Semantic Models
Data Agents are now generally available in Microsoft Fabric, changing how businesses interact with their data. Instead of relying only on static dashboards, users can now ask questions in natural language and get real insights instantly.
In this guide, I’ll walk you through how to set up an AI Agent on top of your Power BI semantic model — and what actually matters in real-world use.
What are Fabric AI Agents?
A Fabric AI Agent is a chat-based interface powered by AI that connects directly to your data model.
Think of it as:
A BI Analyst on demand
A smarter version of Q&A
A bridge between business users and your semantic model
Prerequisites
Before you start, you will need:
A Fabric capacity workspace (F2 and above)
A published semantic model
Access to the Power BI Admin portal
Step 1: Enable AI Capabilities
Within the Admin portal, you will need to enable the Copilot and Azure OpenAI Service settings under Tenant Settings.
Please note that this also enables:
Data sent to Azure OpenAI to be processed outside your capacity’s geographic region, compliance boundary, or national cloud instance
Data sent to Azure OpenAI to be stored outside your capacity’s geographic region, compliance boundary, or national cloud instance
This means that some processing may happen outside your Fabric capacity region.
At this stage, this setting appears to be required. However, as organisations adopt Data Agents more widely, this may change over time.
Step 2: Create Your Agent
To create your agent, go into your Fabric workspace, click New > Data Agent, and then give your agent a name.
A good practice is to give it a role-based name, such as Sales Analyst Agent.
Step 3: Connect to a Semantic Model
Before connecting your agent to a semantic model, make sure the model follows best practices, such as a star schema design.
Once you have connected to the Semantic model, select all the tables you want the Agent to connect to. You can select your measures, fact and dim tables
Step 4: Define Role & Purpose
Within your agent, there is a section for Agent Instructions.
Go to Setup > Agent Instructions and add your prompt there.
This is one of the most important steps, as the quality of the instructions will influence how useful and relevant the agent’s responses are.
Step 5: Testing your agent
Start with a simple prompt such as “Total Sales” and work your way up.
Then try breaking results down by time periods, for example:
Total Sales by Year
Total Sales by Quarter
After that, test across key dimensions such as Sales Manager and Product.
I’ve found that these agents can quickly pick up your style of questioning, which makes testing even more important.
Check for:
Accuracy
Relevance
Consistency
Step 6: Publish your agent
Once you are happy with the model's performance, you can publish your agent
Common Pitfalls
Treating it like magic
It’s not. It’s only as good as your data model.
Poor instructions
Generic agents give generic answers.
Weak semantic layer
If your model isn’t business-ready, the agent won’t be either.
CONTENT
SHARE