CONTENT
Creating a basic Azure Function App and Azure Function
Learn how to create a basic Function App in Microsoft Azure Portal and build a Python function using VS Code.


Saartje Ly
Data Engineering Intern
April 3, 2024
Creating a Basic Function App in Microsoft Azure Portal
If you don’t have a Microsoft Azure account, you may use the 30 day free trial offered.
1. From the home page, click on the ‘Function App’ button
2. Click ‘Create’ on the upper left hand corner
3. Create a new Resource Group by clicking on ‘Create new’
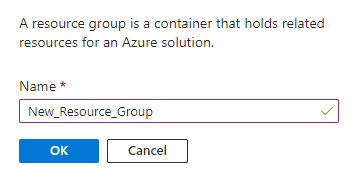
4. Create a new valid Function App name
5. Choose to publish through Code or Docker container, then fill the necessary boxes
6. Choose your operating system
7. Choose your plan type
8. Skip to Review + Create on the top bar
9. Click the ‘Create’ button on the lower left hand corner
10. Once your deployment is complete, click ‘Go to resource’
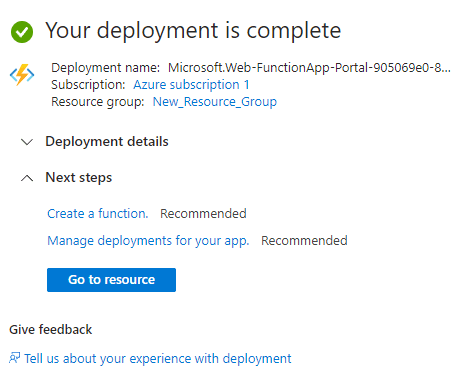
Congratulations, you are now inside your Azure Function App!
Creating a Basic Function with VS Code Desktop using Python
Once you are inside your app, select your preferred environment. In this tutorial we will be demonstrating how to create a Function with VS Code Desktop.
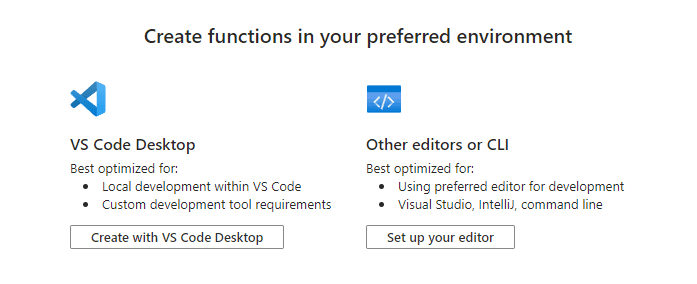
Before you begin, make sure you have the following requirements in place:
A Python version that is supported by Azure Functions
The Python extension for Visual Studio Code
The Azure Functions extension for Visual Studio Code, version 1.8.1 or later
The Azurite V3 extension for Visual Studio Code
Install Azure Function Core Tools
1. Once VSC is open, select the Azure icon in the activity bar
2. Hover over the WORKSPACE dropdown, click the Azure Functions icon, and select ‘Create Function’
3. Choose the directory location for your project workspace and choose Select. You should either create a new folder or choose an empty folder for the project workspace. Don't choose a project folder that is already part of a workspace.
4. Choose a language for your project up the top as prompted
5. Select an HTTP trigger or skip for now. You can always add a function to your project later.
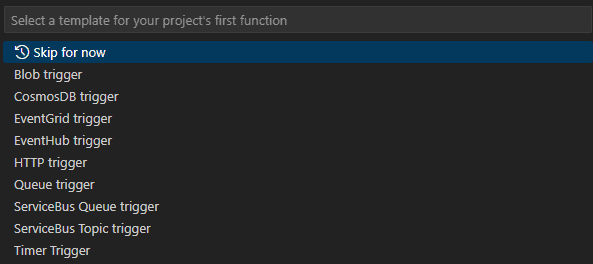
6. Select your function and hit enter
7. Choose ‘FUNCTION’ for the authorization level
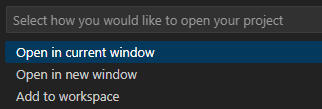
8. Select ‘Add to workspace’
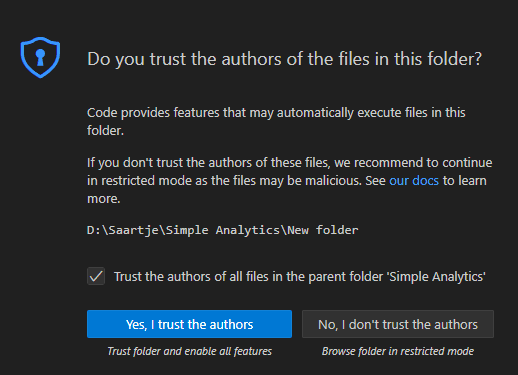
9. Select ‘Yes, I trust the authors’
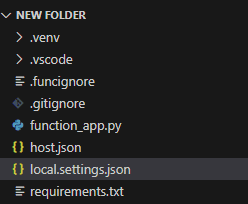
A function has been created in your chosen language and in the template for an HTTP-triggered function.
10. Navigate to local.settings.json
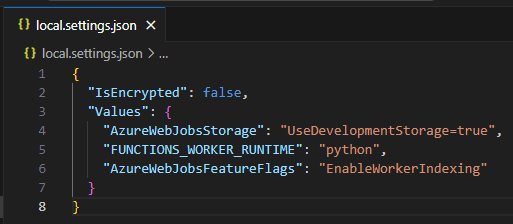
11. Replace the empty value of “AzureWebJobStorage” with “UseDevelopmentStorage=true”
“UseDevelopmentStorage=true” means the application will use the local development storage emulator for testing and development purposes. In a production environment, this value would typically be set to the connection string of the actual Azure Storage account.
12. Press F1, type “Azurite: start”, and hit enter.
13. Navigate back to function_app.py, then hit F5 to run the Python code
14. Copy and paste the http link into your web browser
Creating a Basic Function App in Microsoft Azure Portal
If you don’t have a Microsoft Azure account, you may use the 30 day free trial offered.
1. From the home page, click on the ‘Function App’ button
2. Click ‘Create’ on the upper left hand corner
3. Create a new Resource Group by clicking on ‘Create new’

4. Create a new valid Function App name
5. Choose to publish through Code or Docker container, then fill the necessary boxes
6. Choose your operating system
7. Choose your plan type
8. Skip to Review + Create on the top bar
9. Click the ‘Create’ button on the lower left hand corner
10. Once your deployment is complete, click ‘Go to resource’

Congratulations, you are now inside your Azure Function App!
Creating a Basic Function with VS Code Desktop using Python
Once you are inside your app, select your preferred environment. In this tutorial we will be demonstrating how to create a Function with VS Code Desktop.

Before you begin, make sure you have the following requirements in place:
A Python version that is supported by Azure Functions
The Python extension for Visual Studio Code
The Azure Functions extension for Visual Studio Code, version 1.8.1 or later
The Azurite V3 extension for Visual Studio Code
Install Azure Function Core Tools
1. Once VSC is open, select the Azure icon in the activity bar
2. Hover over the WORKSPACE dropdown, click the Azure Functions icon, and select ‘Create Function’
3. Choose the directory location for your project workspace and choose Select. You should either create a new folder or choose an empty folder for the project workspace. Don't choose a project folder that is already part of a workspace.
4. Choose a language for your project up the top as prompted
5. Select an HTTP trigger or skip for now. You can always add a function to your project later.

6. Select your function and hit enter
7. Choose ‘FUNCTION’ for the authorization level
8. Select ‘Add to workspace’

9. Select ‘Yes, I trust the authors’

A function has been created in your chosen language and in the template for an HTTP-triggered function.
10. Navigate to local.settings.json

11. Replace the empty value of “AzureWebJobStorage” with “UseDevelopmentStorage=true”
“UseDevelopmentStorage=true” means the application will use the local development storage emulator for testing and development purposes. In a production environment, this value would typically be set to the connection string of the actual Azure Storage account.

12. Press F1, type “Azurite: start”, and hit enter.
13. Navigate back to function_app.py, then hit F5 to run the Python code
14. Copy and paste the http link into your web browser
Creating a Basic Function App in Microsoft Azure Portal
If you don’t have a Microsoft Azure account, you may use the 30 day free trial offered.
1. From the home page, click on the ‘Function App’ button
2. Click ‘Create’ on the upper left hand corner
3. Create a new Resource Group by clicking on ‘Create new’

4. Create a new valid Function App name
5. Choose to publish through Code or Docker container, then fill the necessary boxes
6. Choose your operating system
7. Choose your plan type
8. Skip to Review + Create on the top bar
9. Click the ‘Create’ button on the lower left hand corner
10. Once your deployment is complete, click ‘Go to resource’

Congratulations, you are now inside your Azure Function App!
Creating a Basic Function with VS Code Desktop using Python
Once you are inside your app, select your preferred environment. In this tutorial we will be demonstrating how to create a Function with VS Code Desktop.

Before you begin, make sure you have the following requirements in place:
A Python version that is supported by Azure Functions
The Python extension for Visual Studio Code
The Azure Functions extension for Visual Studio Code, version 1.8.1 or later
The Azurite V3 extension for Visual Studio Code
Install Azure Function Core Tools
1. Once VSC is open, select the Azure icon in the activity bar
2. Hover over the WORKSPACE dropdown, click the Azure Functions icon, and select ‘Create Function’
3. Choose the directory location for your project workspace and choose Select. You should either create a new folder or choose an empty folder for the project workspace. Don't choose a project folder that is already part of a workspace.
4. Choose a language for your project up the top as prompted
5. Select an HTTP trigger or skip for now. You can always add a function to your project later.

6. Select your function and hit enter
7. Choose ‘FUNCTION’ for the authorization level
8. Select ‘Add to workspace’

9. Select ‘Yes, I trust the authors’

A function has been created in your chosen language and in the template for an HTTP-triggered function.
10. Navigate to local.settings.json

11. Replace the empty value of “AzureWebJobStorage” with “UseDevelopmentStorage=true”
“UseDevelopmentStorage=true” means the application will use the local development storage emulator for testing and development purposes. In a production environment, this value would typically be set to the connection string of the actual Azure Storage account.

12. Press F1, type “Azurite: start”, and hit enter.
13. Navigate back to function_app.py, then hit F5 to run the Python code
14. Copy and paste the http link into your web browser
CONTENT
SHARE